[Bricox] McGivering Megasquirt V3.0 - DIY Rules

[BRICOX], [INFOX], [DOCUX] seleccionados por la administracion.

Moderadores: Alan78, Tropic, Operadores, Moderadores

Responder
Avatar de Usuario
NeWbIe_SLMNK
Master Calibreitor!
Mensajes: 8578
Registrado: Mar, 30 May 2006, 14:00
Ubicación: Karrosseriebau Nr.3

Re: [Bricox] McGivering Megasquirt V3.0 - DIY Rules

Mensaje por NeWbIe_SLMNK »

NeWbIe_SLMNK escribió:Gñ gñ... ¿A efectos de hardware la MS3 es identica a la PNP del Miata?
Me autocontesto, el bicho calza una V3.57 sin micro y la MS3 es una carta que contiene un micro mas totxo y los interfaces de comunicacion con la placa principal, con el pc via USB y con la carta de expansion (I/O) opcional MS3X a la vez que aloja una memoria SD a efectos de datalogging.

La MS3X es la expansion de entradas y salidas y va cargada de regalitos:
8 injector drivers (high-z or low-z with external resistors)
8 logic level spark outputs
6 mid current outputs for driving small solenoids or relays (on/off or PWM)
3 analogue inputs (0-5V)
4 switch inputs
Cam sensor input
Tentador, sin duda! :twisted:
ImagenImagen
Sphinx
Calibrero de pro
Mensajes: 1677
Registrado: Sab, 03 Ene 2009, 21:47
Ubicación: Ourense
Contactar:

Re: [Bricox] McGivering Megasquirt V3.0 - DIY Rules

Mensaje por Sphinx »

NeWbIe_SLMNK escribió:
Sphinx escribió:joer ya me molaria saber solo la mitad de lok sabeis vosotros
No me vale! :finga:

Leete este hilo entero y ciertas joyitas estrategicas que estan escondidas por el foro ("Como hacer gastar lo minimo a un C20NE" by MarteDJ y "Megasquirt (PNP) Praxis en Miata 1.6" by TELVM) y continua con el megamanual. Teniendolo tan a huevo si no sabes es porque no quieres :razz:
Sphinx escribió:ya me gustaria sabes hacer una MS jeje
Eso es mas facil aun, mirate los videos de MarteDJ al principio de este hilo y veras como adquirir las tecnicas para montarla. El resto es seguir las instrucciones y armar el puzzle!

Animate y pasate al lado hereje! :badgrin:

XDD lo intentare, aunke nose yo, seguro que acabare sabiendolo pero bueno el tiempo y la practica lo hace todo jeje, ya supe menos de lok se ahora jeje.

Saludos: Sphinx
BRN BOSS
TELVM
Master Calibreitor!
Mensajes: 16918
Registrado: Mar, 23 Dic 2003, 01:03
Ubicación: Madrid
Contactar:

Re: [Bricox] McGivering Megasquirt V3.0 - DIY Rules

Mensaje por TELVM »

MarteDJ escribió:C31 y D24 fueron los que tube que cambiar para que no se atocinase a Hi RPM ...

Yep, posible gremlin con estos dos elementos.

Conato sherlockhólmico para identificación de mi C31: Tiene la banda central color beige, como todos los demas condensadores que veo, salvo C24 y C25 (blanca). Mi C31 parece tener la misma área y el mismo fondo que C32 y C11 (0.01µF 50V); C30 (0.22µF 50V) tiene más área y más fondo; C13 (0.1µF 50V) tiene la misma área, pero más fondo.

Si estas diferencias físicas significan algo, es posible que C31 sea de 0.01µF, y quizá hasta de 0.001µF con un poco de suerte.

D24 no tiene marcas ni diferencias físicas significativas con los otros diodos.


Anyway con estos dos ya nos rascaríamos cuando picara, if (corte a 4000 y tal :cuñao: ). Pasemos a los jumpers.


La 357 Magnum tiene su folklore particular en cuestión de jumpers:


Tach input selection jumper JP1 is now on 0.100 inch header.

* Placing a jumper across positions 1 and 2 enables the variable reluctance (VR) circuit.
* Placing a jumper across positions 2 and 3 enables opto-isolator ("Hall") tach input.
Imagen
Esta en 2-3 como corresponde a los sensores ópticos del Miata; habría que cambiar a 1-2 para VR.

Tach selection jumper J1 is for routing the signal-conditioned tach signal to the processor. Only one jumper is used, the remaining positions are open.

* A jumper on pins 1 - 2 enables the opto-isolator.
* A jumper on pins 3 - 4 enables VR (variable reluctor) operation (non-inverted).
* A jumper on pins 5 - 6 is for an inverted VR signal.
Imagen
Similar copla, habría que cambiar a 3-4 (VR no invertida) o 5-6 (VR invertida). ¿Qué me cuentas aquí Marivs :wink: ?
Imagen
Imagen
"The only true law is that which leads to freedom"
(Jonathan Livingston Seagull)
MarteDJ
Master Calibreitor!
Mensajes: 6352
Registrado: Mié, 10 Mar 2004, 13:30
Ubicación: Madris
Contactar:

Re: [Bricox] McGivering Megasquirt V3.0 - DIY Rules

Mensaje por MarteDJ »

la señal es VR no invertida
martedj@hotmail.com
Mazda2 petroletas - 1993 Fragoneta de los malacatones
Big Boys Team Member

https://www.youtube.com/channel/UC_dncz ... Tal7aaxTNQ
"Think Outside of The Box" -Motoman
Avatar de Usuario
NeWbIe_SLMNK
Master Calibreitor!
Mensajes: 8578
Registrado: Mar, 30 May 2006, 14:00
Ubicación: Karrosseriebau Nr.3

Re: [Bricox] McGivering Megasquirt V3.0 - DIY Rules

Mensaje por NeWbIe_SLMNK »

Temome que a falta de mas datos, no es muy fiable eso de verificar la capacidad de un condensador mediante su tamaño:
All the V3.57 main board's integrated circuits, resistors, caps, etc, are surface mount devices (SMD). The V3.57 main board uses the mostly 0805 SMD footprint for the user assembled devices, but there are also a few 1206 and 2502 sized devices.
En su diseño se han usado estas "3 tallas" cuando ha sido posible, pero da la casualidad de que esos dos tipos de condensador se fabrican en cualquiera de las 3 tallas antes mencionadas respetando caracteristicas de referencias.

0805 2012 .08" x .05" 2.0 x 1.2mm
1206 3216 .12" x .06" 3.2 x 1.6mm

¿No puedes meterle polimetro a ver como canta? ¿O al menos el nonio a ver medidas exactas?

Marivs/Telvm a ver si me aclaro:

En el J1 si no me confundo, tenemos un traductor a onda cuadrada de las curvitas que suelta el VR. Por lo que canta el megamanual con las graficas

Imagen

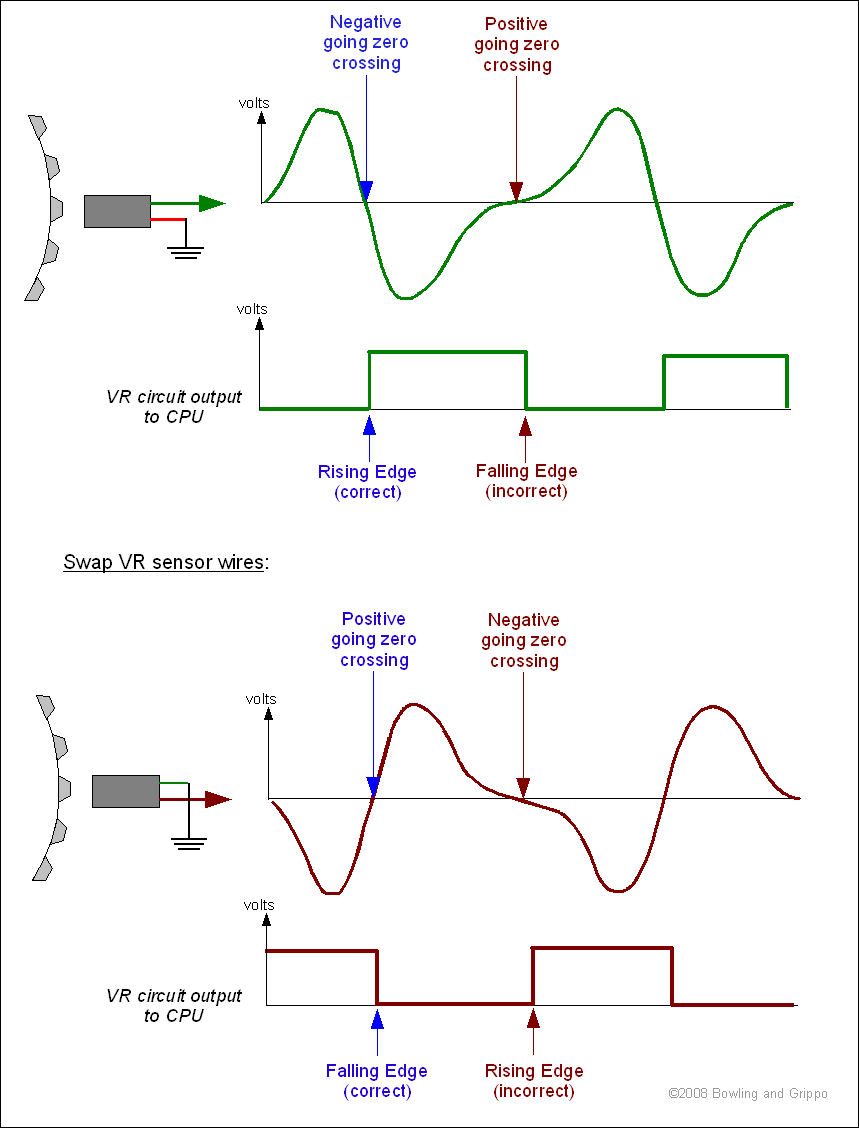
Cambiando los cables del VR le damos la vuelta a la pelicula, lo que puede hacer que la MS se fije en el flanco de la onda que no debe.
How do you know which is the correct edge to trigger on? Here are three ways:

1. (Best) Set it up on the bench the way you want to set it up on the car and scope the output. Even then you have to figure out how this will come out when it goes through the VR circuit.(And the MS-II™ and MicroSquirt® circuits are different, to add to the problem). This confusion can be avoided by oscilloscope to observe both the input waveform to the circuit and the output of the circuit that goes to the processor. Then you want to select the polarity of the edge going to the ECU to be that which lines up with the 'most vertical' zero crossing on the VR input side.

2. (Easiest) Go ahead and set the delay tooth, trigger edge and trigger offset under the assumption that the zero crossing trigger will occur when the centers of the sensor and tooth are aligned and this will be what the ECU sees. Then check with a timing light, and if things are not right (i.e. if the timing is off by a long ways, timing changes with engine speed beyond what the timing table dictates, and the timing is 'jittery', you can reverse the polarity on the VR sensor wires (see above), or the change the trigger edge using the software input.

3. Use the tachRef program. This will show what the teeth will look like to the ECU. The wrong polarity will show up as either an extra tooth or erratic spacing of the teeth in the region around the missing tooth section. If polarity is right and the sensor/wheel tooth are matched, you should be able to pick one edge (rising or falling) such that the distances between those edges should all be the same except double(triple) around one (two) missing tooth.
Parece que el jumper ni lo toca de non-inverted y juguetea con los cables salvo raras excepciones:
If you are using another trigger source feeding the VR input circuit (say the EDIS PIP or some Hall sensors) the polarity may need to be changed, this is when they use the other op-amp output (VROUTINV) instead this polarity follows the VR sensor so a negative-to-positive VR sensor yields a ground-to-positive digital output.
¿Ello es asin?
ImagenImagen
TELVM
Master Calibreitor!
Mensajes: 16918
Registrado: Mar, 23 Dic 2003, 01:03
Ubicación: Madrid
Contactar:

Re: [Bricox] McGivering Megasquirt V3.0 - DIY Rules

Mensaje por TELVM »

¿No puedes meterle polimetro a ver como canta?
¿Puedo medir estos condensadores con este polímetro?:

Imagen
¿O al menos el nonio a ver medidas exactas?
2.o x 1.2 mm
MarteDJ escribió:la señal es VR no invertida
Roger roger.

Seguimos con los inputs ...


Sensor Temp Motor

54. Install and solder R4 and R7 {2.49KXBK-ND, 2.49K, red-yellow-white-brown-brown). These are the temperature sensor "bias" resistors. They install above the "&" in the copyright notice.

If you want to use other sensors, you can either:

* change the transfer-function files in the MegaSquirt® 68HC908 processor by using EasyTherm to change MegaSquirt's code to match your temperature sensors), or with MegaSquirt-II you 'recalibrate' the sensor table in MegaTune under 'Tools/Calibrate Thermistor Tables...',
* OR switch these bias resistors, which may be easier in some cases.

... GM / Daewoo ... ... ... ... ... 2.49K

... Bosch .... .... ... ... ... ... ... 2.2K
Imagen
Estos dos son de 2.49K (marcados 2491). ¿Aceptamos barco, o mejor 2.2K?

(Anyway cualquier problemilla aquí probablemente se pueda hackear con EasyTherm)
Imagen
Imagen
"The only true law is that which leads to freedom"
(Jonathan Livingston Seagull)
Avatar de Usuario
JoshuA
Master Calibreitor!
Mensajes: 4357
Registrado: Dom, 12 Dic 2004, 14:12
Ubicación: Pontevedra
Contactar:

Re: [Bricox] McGivering Megasquirt V3.0 - DIY Rules

Mensaje por JoshuA »

Perdonad el pequeño off-topic, pero viendo la megasquirt y sus posibilidades, y mis intenciones de montar coilpacks en el LET y mandar a freir esparragos al distribuidor, me estoy planteando incluso hacerme con una, pero tengo unas dudillas:

La MS soporta DIS? necesitaria para esto un sensor de posicion para el arbol de levas? el sensor que lleva de serie el C20XE con su arbol 2.8 bastaria? y el coilpack del C20XE podria valer?

Que parametros iniciales tiene? para poder arrancar el motor me refiero :roll: O hay que usar el sistema de prueba y error? hay algun parametro generico?
Calibra Turbo 4x4 1994
Vectra GSI 2000 16v 1992

¿Te gusta conducir?

THE BIG BOYS TEAM MEMBER Nº6
TELVM
Master Calibreitor!
Mensajes: 16918
Registrado: Mar, 23 Dic 2003, 01:03
Ubicación: Madrid
Contactar:

Re: [Bricox] McGivering Megasquirt V3.0 - DIY Rules

Mensaje por TELVM »

Consten en acta para la posteridad calibrera los triggers para el C25XE V6:
Base teeth is set to 60
Missing teeth is set to -2
TrigA=10
Ret A=8
Trig B=30
Ret B=28
trig C=50
ret C=48
Rest are all 0.
[TAGS: Megasquirt Calibra V6 C25XE X25XE wheel decoder settings trigger position trigger return base teeth missing teeth]

JoshuA escribió:La MS soporta DIS? necesitaria para esto un sensor de posicion para el arbol de levas? el sensor que lleva de serie el C20XE con su arbol 2.8 bastaria? y el coilpack del C20XE podria valer?
Si; no necesariamente; si; si.
JoshuA escribió:Que parametros iniciales tiene? para poder arrancar el motor me refiero :roll: O hay que usar el sistema de prueba y error? hay algun parametro generico?
Te lo contamos cuando la tengas armada y conectada. Hasta entonces ve empollando: http://www.msextra.com/doc/ms1extra/MS_ ... Manual.htm
Imagen
Imagen
"The only true law is that which leads to freedom"
(Jonathan Livingston Seagull)
MarteDJ
Master Calibreitor!
Mensajes: 6352
Registrado: Mié, 10 Mar 2004, 13:30
Ubicación: Madris
Contactar:

Re: [Bricox] McGivering Megasquirt V3.0 - DIY Rules

Mensaje por MarteDJ »

saludos

recalibraria con easytherm, mejor no tacar nada si es posible :caguen:

al final lo tube que hacer para que rulase algo mejor el IAT, aunque tu tienes un sensor aftermarket de miata que se lo puedes endiñar y pillar la configuracion del mismo

el archivito del CLT creo que lo conservo :cuñao: aunque le podemos hacer de nuevo si hace falta compañero, es el huevo del tonto :burla:
martedj@hotmail.com
Mazda2 petroletas - 1993 Fragoneta de los malacatones
Big Boys Team Member

https://www.youtube.com/channel/UC_dncz ... Tal7aaxTNQ
"Think Outside of The Box" -Motoman
TELVM
Master Calibreitor!
Mensajes: 16918
Registrado: Mar, 23 Dic 2003, 01:03
Ubicación: Madrid
Contactar:

Re: [Bricox] McGivering Megasquirt V3.0 - DIY Rules

Mensaje por TELVM »

MarteDJ escribió:al final lo tube que hacer para que rulase algo mejor el IAT, aunque tu tienes un sensor aftermarket de miata que se lo puedes endiñar y pillar la configuracion del mismo
Yep yep yep.
el archivito del CLT creo que lo conservo :cuñao: aunque le podemos hacer de nuevo si hace falta compañero, es el huevo del tonto :burla:
:lol: Ya le haremos entrar en disciplina :martillazo: .

Mañana empezamos con los outputs, ahí viene cuando la matan :roll: .


BTW vaya el descifrado de la rueda fónica Bosch 60-2 de los C20NE / 20SEH / C20XE / C20LET:


Imagen

Imagen


Imagen

Imagen

Imagen

Imagen
Última edición por TELVM el Dom, 28 Mar 2010, 16:22, editado 3 veces en total.
Imagen
Imagen
"The only true law is that which leads to freedom"
(Jonathan Livingston Seagull)
Avatar de Usuario
NeWbIe_SLMNK
Master Calibreitor!
Mensajes: 8578
Registrado: Mar, 30 May 2006, 14:00
Ubicación: Karrosseriebau Nr.3

Re: [Bricox] McGivering Megasquirt V3.0 - DIY Rules

Mensaje por NeWbIe_SLMNK »

TELVM escribió:¿Puedo medir estos condensadores con este polímetro?:

Imagen
Con ese nop, con el de Marivs del carrefù sip :rolleyes:
2.o x 1.2 mm
La jodimos, eso sigue siendo un encapsulado SMD 8050 (0,08" x 0,05") y es lo que mas abunda en la MSIE. No hay ningun problema en encontrar condensadores de ambas capacidades en el mismo tamaño. Toca medir si no llevan ni un numero ni una triste marca encima. Esa referencia Digi-Key te manda de cabeza a un encapsulado radial (AKA "LENTEJA") que no sirve.
54. Install and solder R4 and R7 {2.49KXBK-ND, 2.49K, red-yellow-white-brown-brown). These are the temperature sensor "bias" resistors. They install above the "&" in the copyright notice.

If you want to use other sensors, you can either:

* change the transfer-function files in the MegaSquirt® 68HC908 processor by using EasyTherm to change MegaSquirt's code to match your temperature sensors), or with MegaSquirt-II you 'recalibrate' the sensor table in MegaTune under 'Tools/Calibrate Thermistor Tables...',
* OR switch these bias resistors, which may be easier in some cases.

... GM / Daewoo ... ... ... ... ... 2.49K

... Bosch .... .... ... ... ... ... ... 2.2K
El lado "perezoso" es meterle mano por soft, pero ya teniendo que cambiar mas componentes y queriendo hacer las cosas bien a la primera, lo mismo me daria 4 que 40 aun sabiendo lo engorroso de una placa SMT. A la carga!

Tengo el Excel petao y no puedo echar un vistazo a como turula el "decoder settings", pero mas o menos se intuye ya que en el ejemplo va todo igual excepto el piño que cuadra con el sensor con el 1 en PMS. A ver si me pispo de como va exactamente cada parametro...
ImagenImagen
Avatar de Usuario
NeWbIe_SLMNK
Master Calibreitor!
Mensajes: 8578
Registrado: Mar, 30 May 2006, 14:00
Ubicación: Karrosseriebau Nr.3

Re: [Bricox] McGivering Megasquirt V3.0 - DIY Rules

Mensaje por NeWbIe_SLMNK »

Ya me estoy comiendo el tarro... :caguen:

¿El Trigger return que coño es exactamente? ¿El timing de chispa "default" pa arrancar y emergencias mas retarded que los del planeta-hueco?

En el caso del C20NE cuadra que el trigger return vaya 48º detras (8 piños) del trigger, pero me raya que en el caso del C25XE el return vaya 12º antes (2 piños) que el trigger. Algo no me cuadra asique habre soltado la burrada del siglo.

Pero ni con el manual de la MSIE ni con el excell doy con donde meto la pata, es mas, en el excel si el Trig A es X, el Trig Return A es X+8 con ruedas 60-2 per cujons. Siempre el return (8 piños) 48º detras del trigger.
ImagenImagen
TELVM
Master Calibreitor!
Mensajes: 16918
Registrado: Mar, 23 Dic 2003, 01:03
Ubicación: Madrid
Contactar:

Re: [Bricox] McGivering Megasquirt V3.0 - DIY Rules

Mensaje por TELVM »

NeWbIe_SLMNK escribió:¿El Trigger return que coño es exactamente?
Trigger return = cranking trigger.

Si con rueda 60-2 queremos que encienda 12º APMS durante el arranque:
=> 12º = 2 piños
=> TRIGGER A -2 = TRIGGER RETURN

En el V6:
TRIGGER A = 10
10 -2 = 8
TRIGGER RETURN A = 8

& so on.
Imagen
Imagen
"The only true law is that which leads to freedom"
(Jonathan Livingston Seagull)
Avatar de Usuario
NeWbIe_SLMNK
Master Calibreitor!
Mensajes: 8578
Registrado: Mar, 30 May 2006, 14:00
Ubicación: Karrosseriebau Nr.3

Re: [Bricox] McGivering Megasquirt V3.0 - DIY Rules

Mensaje por NeWbIe_SLMNK »

Roger! El Trigger A no existe, son los padres! :lol:

Se agradece muchisimo esa nueva ayuda grafica! :pulgar:
ImagenImagen
TELVM
Master Calibreitor!
Mensajes: 16918
Registrado: Mar, 23 Dic 2003, 01:03
Ubicación: Madrid
Contactar:

Re: [Bricox] McGivering Megasquirt V3.0 - DIY Rules

Mensaje por TELVM »

NeWbIe_SLMNK escribió:El Trigger A no existe, son los padres! :lol:
TRIGGER A = Nº piño ante sensor en PMS - (TRIGGER ANGLE en grados / grados por cada piño)


V.g. en un C20NE, con piño nº 21 ante sensor en PMS, TRIGGER ANGLE = 60º, y 6º por piño al ser rueda 60-2 (360º/60 piños = 6º por piño):

TRIGGER A = piño nº 21 - (60º / 6º) = piño nº 21 -10 piños = piño nº 11

----------

TRIGGER A es un número ordinal de piño.

TRIGGER RETURN es un número ordinal de piño.

TRIGGER ANGLE es un ángulo en grados.

CRANKING ANGLE es un ángulo en grados.

----------

Un 4 en línea enciende cada 180º, y necesita 2 triggers.

V.g. en un C20NE:

TRIGGER A = 11

TRIGGER B = TRIGGER A + 30 piños (180º de piños en una 60-2) = 11 + 30 = 41

----------

Un 6 cilindros (en línea o V6) enciende cada 120º y necesita 3 triggers.

V.g. en un C25XE:

TRIGGER A = 10

TRIGGER B = TRIGGER A + 20 piños (120º de piños en una 60-2) = 10 + 20 = 30

TRIGGER C = TRIGGER B + 20 piños (120º de piños en una 60-2) = 30 + 20 = 50
Imagen
Imagen
"The only true law is that which leads to freedom"
(Jonathan Livingston Seagull)
TELVM
Master Calibreitor!
Mensajes: 16918
Registrado: Mar, 23 Dic 2003, 01:03
Ubicación: Madrid
Contactar:

Re: [Bricox] McGivering Megasquirt V3.0 - DIY Rules

Mensaje por TELVM »

Vamos con los outputs de la PnP.
56. Install and solder R14 and R17 {10KEBK-ND, 10K Ohm, brown-black-orange). These are located near the center of the PCB, in the column of components roughly aligned with Q9 on the heat sink.
Imagen
57. Install and solder R16, R19, R26, R27, and R29 {1.0KEBK-ND, 1K Ohm, brown-black-red}. R16 is near the MOV1 (but a bit further away from the DB37 connector). R19 is to the right (closer to the DB37 connector) of the resistors you installed in the last step (R14 & R17) on the other side of C13 and C14. R26, R27, & R29 are located near the LEDs at the DB9 end of the PCB.
Imagen Imagen
58. Install and solder D3 {1N4001DICT-ND}. This is located near the center of the PCB, near R14 and R17. Observe the proper polarity.
Imagen
59. Install and Solder D4 and D8 {1N4748ADICT-ND} - observe the proper polarity. These are located beside MOV1, a bit further away from the DB37 connector. (Note - do not install D8 if you are using a PWM idle valve.)
Imagen
Estos dos no estan donde deberían en una 3.0, y no los veo por ninguna parte, tampoco en la daughterboard. Que falte D8 es incluso bueno (p'al Misil), pero no encontrar D4 mosquea :-k .

El Miata rula con válvula de ralentí nipona, empero :-k .


60. Install and solder R15 and R20 {22QBK-ND, 22 Ohm, red-red-black}. R15 is located below the Q1 location on the heat sink, R20 is located below the R38 location on the heat sink.
Imagen
61. Install and solder R24, R25, and R28 {330QBK-ND, 330 Ohm, orange-orange-brown). These are located very near the LEDs on the DB9 end of the PCB.
Imagen
62. Install and solder the transistors Q2 and Q4 {ZTX450-ND}. These are located to the left of the MOV1. The side of the transistor with the white label faces the DB37 connector. If you got this transistor from a distributor (as part of a kit) then they likely have special instructions for it (search the packaging or contact the distributor). Distributors sometimes make substitutions for various reasons, and thus their notes are important. If your Q2/Q4 are the standard Digi-Key part {ZTX450-ND}, but don't have a white label, then the side with the rounded edges is the 'curved side', which is oriented to be closest to the DB37 connector.
Note - if you are using a PWM idle valve (Ford or Bosch 2 wire valve - see this link for more information), these valves can not be operated with a relay. As a result, they need a higher capacity transistor installed.

DO NOT install Q4 for use with PWM idle valves - it cannot handle the current directly for PWM idle valves. ('On/Off' type idle valves used with a relay are fine with the default Q4.)

Instead, for a PWM idle valve, use a TIP120/121/122 transistor (such as Digi-Key 497-2539-5-ND, 74¢ ea.) mounted on either the heat sink (if you have a spare spot) or the case. You should use a mica insulator (4724K-ND, 93¢) with heat sink grease as well. Run wires to the Q4 connections as shown below:

Do not install Q20, do not install D8, and jumper R39 as well. You will also have to put a 1N4001 diode across the PWM Idle valve itself - the banded end goes to the 12 Volt supply, the non-banded end goes to the lead that goes to MegaSquirt® (this diode is for flyback purposes on the idle valve).
En la PnP tanto Q2 ...
Imagen
... como Q4 ...
Imagen
estan en la daughterboard.

Q4 lleva las marcas 'IRL Z44Z ... 1&R 735P ... 8M LG'. Tiene debajo lo que pudiera ser un 'mica insulator (4724K-ND, 93¢) with heat sink'.

Hablando de 'Micas', en el heat sink largo de arriba hay dos TIP 125 marcados 'TIP 125':


Imagen

Q20 no esta donde debería estar en una 3.0, ni por ninguna otra parte; D8 hemos visto antes que tampoco esta; R39 no esta donde debería estar en una 3.0, ni por ninguna otra parte.


Paramos aquí y Hermanos: Rumiemos [-o< .
Imagen
Imagen
"The only true law is that which leads to freedom"
(Jonathan Livingston Seagull)
TELVM
Master Calibreitor!
Mensajes: 16918
Registrado: Mar, 23 Dic 2003, 01:03
Ubicación: Madrid
Contactar:

Re: [Bricox] McGivering Megasquirt V3.0 - DIY Rules

Mensaje por TELVM »

Imagen

Imagen
Imagen
"The only true law is that which leads to freedom"
(Jonathan Livingston Seagull)
Avatar de Usuario
Tropic
Site Admin
Mensajes: 27526
Registrado: Sab, 20 Dic 2003, 00:17
Ubicación: Vitoria
Contactar:

Re: [Bricox] McGivering Megasquirt V3.0 - DIY Rules

Mensaje por Tropic »

No se si estais subiendo las pics a imageshack vosotros o estais cogiendo los enlaces pero... sabeis que podeis subirlas directamente al foro desde cada mensaje, y que se quedaran ahi para siempre? :)
TC026: Find a place, meet your friends, stir, have fun...
[img]kdd2008finbh3.jpg[/img]
Porque nadie sabe, ni imagina, en que punto del mapa volveremos a reunirnos...
MarteDJ
Master Calibreitor!
Mensajes: 6352
Registrado: Mié, 10 Mar 2004, 13:30
Ubicación: Madris
Contactar:

Re: [Bricox] McGivering Megasquirt V3.0 - DIY Rules

Mensaje por MarteDJ »

D4 segun esquemas tiene algo que ver con la bomba de combustible, quizas en esta version dejo de ser necesario :?:

R39 tiene que ver con la valvula de relenti, pide que se puentee, asi que si no esta puenteado estara
v3pcb_5.gif
por otro lado, lo unico que necesitamos es que Q4 sea un TIP122 que es un transistor de 5A en lugar de 1A del ZTX450

yo instale el TIP122 como dicen en ms-extra.com y funciona

si en Q4 llevas un IRLZ44Z la web dice que es un transistor mosfet de 51A me parece una barbaridad, pero podria colar


ahora me asalta otra duda, si usas la daughterboard no tenedremos un canector DB37 para conectar, sino que tendremos que descifrar un conector de Miata ¿no es asi?
martedj@hotmail.com
Mazda2 petroletas - 1993 Fragoneta de los malacatones
Big Boys Team Member

https://www.youtube.com/channel/UC_dncz ... Tal7aaxTNQ
"Think Outside of The Box" -Motoman
TELVM
Master Calibreitor!
Mensajes: 16918
Registrado: Mar, 23 Dic 2003, 01:03
Ubicación: Madrid
Contactar:

Re: [Bricox] McGivering Megasquirt V3.0 - DIY Rules

Mensaje por TELVM »

MarteDJ escribió:D4 segun esquemas tiene algo que ver con la bomba de combustible, quizas en esta version dejo de ser necesario :?:
As a matter of fact ni siquiera aparece en el schematic de la 357 Magnum (o yo estoy muy cegato y no lo veo :pupa: ):
3·57 board schematics 001.jpg
(Los ajuntos estos no quedan bien Maese Site [-( )
R39 tiene que ver con la valvula de relenti, pide que se puentee, asi que si no esta puenteado estara
El adjunto v3pcb_5.gif ya no está disponible
Esto tengo que mirarlo bien levantándole la falda a la placa :) .
por otro lado, lo unico que necesitamos es que Q4 sea un TIP122 que es un transistor de 5A en lugar de 1A del ZTX450

yo instale el TIP122 como dicen en ms-extra.com y funciona

si en Q4 llevas un IRLZ44Z la web dice que es un transistor mosfet de 51A me parece una barbaridad, pero podria colar
O sea que se pasa 10 pueblos (literalmente). Bueno, si el problema con la PWM era quedarse corto no parece que vaya a ser el caso :cuñao: .

Me esta dando la impresión que la 357 Magnum trae de todo, y todo sobradísimo en calibre :razz: . Tiene su lógica, dado el precio de una PnP y lo difícil de modificar SMD.

ahora me asalta otra duda, si usas la daughterboard no tenedremos un canector DB37 para conectar, sino que tendremos que descifrar un conector de Miata ¿no es asi?
De tu mente la duda apartar has de, joven padawan :mrgreen: .

Imagen

Imagen

Imagen

Imagen

1A -- Battery 12V
1B INPUT Main relay 0/12V OFF/ON
1C INPUT IGN switch (start position) 12/0V Cranking/IGN switch ON
1D OUT Self-diagnosis checker
1E -- -- --
1F OUT Self-diagnosis checker
1G OUT Ignitor 0/0.2V IGN switch on/idle
1H OUT Ignitor 0/0.2V IGN switch on/idle
1I -- -- --
1J -- -- --
1K INPUT Diagnosis conector
1L -- -- --
1M -- -- --
1N INPUT Throttle sensor 0/12V suelto/pisado (es un switch) IGN ON
1O INPUT Stoplight switch 0/12V suelto/pisado (es un switch)
1P INPUT P/S pressure switch
1Q -- -- --

1R INPUT Fan switch 0/12V fan on/off (91º C)
1S INPUT Blower switch 0/12V blower on/off IGN ON
1T -- -- --
1U INPUT Headlight Switch 12/0V on/off
1V INPUT Clutch switch 0/12 depressed/released
2A -- -- --
2B -- -- --
2C -- -- --
2D -- -- --
2E INPUT Crank angle sensor (Ne-signal) 0 or 5/2V IGN ON/idle
2F -- -- --
2G INPUT Crank angle sensor (G-signal) 0 or 5/1.5V IGN ON/idle
2H -- -- --
2J INPUT Ground 0V constant
2K OUT Airflow meter 4.5-5.5V constant
2L INPUT Throttle sensor (power terminal) 0/5V accel pedal depressed/released
2M -- -- --
2N INPUT Oxygen sensor 0-1V
2O INPUT Airflow meter 3.8/3.3 IGN ON/idle
2P INPUT Airflow sensor (intake air temp) 2.5V at 20º C
2Q INPUT Engine coolant temp sensor 2.5V @ 20ºC~0.4V @ warm up
2R -- -- --

2S -- -- --
2T -- -- --
2U OUT Injectors 1 & 3 ~12V
2V OUT Injectors 2 & 4 ~12V
2W OUT ISC valve (¿idle?) 7/9V IGN ON/idle
2X OUT Solenoid valve (purge control) 12V
2Y -- -- --
2Z -- -- --
Imagen
Imagen
"The only true law is that which leads to freedom"
(Jonathan Livingston Seagull)
Responder